Let's get to work.

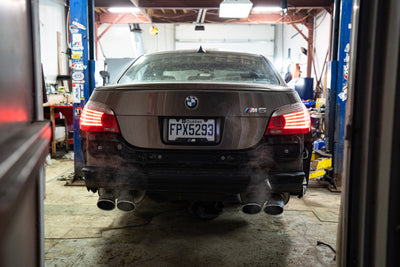
"In this new Special Series named “S85-002”, I earn a badge of honour: I blew up my V10.
I document the service history of my original S85 engine and diagnose its failure. I go through the process to source, refresh, cam and refit the replacement V10 into the E60.
In this entry, we finally get the S85-002 on a stand and get to work. The last accessories are removed, the V10 is drained and we turn it over to start with the obvious: connecting rod bearings - with a new twist.
- Matt
And so it begins, on a stand!
In the previous entry to the series "Shifting Market Dynamics", we finally got our hands on the S85-002 and immediately begun undressing accessories with the engine still on the pallet.
A part of it was excitement, a part of it was removing some weight off the engine. The engine stayed in the corner of the shop for a month as I gathered more parts that we deemed necessary to swap, and gaskets we didn't initially think of.
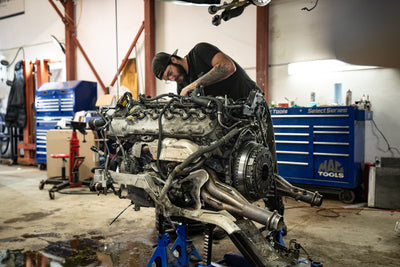
As the parts came in in October, we got to work in November. It was time do it right: the engine got on a stand.
A few main accessories were still remaining, the alternator was still on and the oil filter housing was still dangling.

I filmed, edited and narrated 1 of 2 reels for this entry. The first one is here. Comment on IG!
We had some fiddling to do with the bolts on the stand. The first set was too short, the second set was slightly too long. A game of "Guess the amount of washers we used" was played.

The oil filter housing was removing, along with its plumbing. The filter was pretty mind, showing no signs of shavings.

We moved the S85 out of the corner and into the light, closer to the bench for efficient work. Lugging around a 500 lbs + engine is no fun.

We started with draining the engine of its oil.

Being an early 2006 build, it still had the single drain plug main oil pan. The engine was still full of oil - which is what you want!

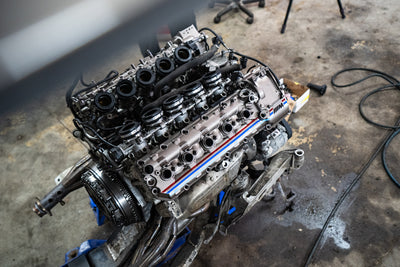
Day 1: connecting rod bearings.
Our first task was to inspect the bottom end, and replace the connecting rod bearings no matter the condition of the current units. The engine being on a stand, the labor time is minimal. The overall work took an afternoon.
With the oil drained, the S85-002 got turned over. These engines have oil everywhere, and 10W60 doesn't tend to move around much. There will be some remaining.
Coolant was still present, though much less.

The OEM steel dual mass flywheel hadn't seen friction in a while - urgh! Still, it's only surface rust, and it didn't show heat marks or excessive wear.

This S85 had a mix of old and new solenoids. As we know, it had VANOS and misfire issues in the past. Whoever replaced this one didn't both with the inner bolts.

The engine didn't come with its OEM headers, but it still had the gaskets. There didn't appear to have been any exhaust leak as none of the ports were blackened.

With the engine still draining, we removed a few other hoses & accessories.

We cleaned her up and got to work removing the main oil pan. Working upside down has its advantages - a lot of them, and some disadvantages.

The main oil pan is comprised of various bolt sizes and head types.

The ones by the flywheel can be a PITA if it's your first time. Thankfully Phil has worked on a myriad of S85s. He knows the tricks that cut down on dozens of hours compared to a first timer on a V10.

With the main oil pan removed, we briefly inspected the bottom end. The probabilities we'd find anything wrong were extremely low: the engine ran without a hitch prior to being pulled from its former chassis, and the oil filter looked clean.

It was clean indeed.

This is why I wanted a 2006 produced S85: the VANOS high pressure oil pump got updated, along with its internal line.

As I documented in "S85s were not created equal", the VANOS pump drives the main oil pump of the entire engine. If it breaks, the risks of oil starvation across the entire engine are very high.

10W60 gets everywhere - it was in all cavities of the bed plate.

The crankcase, bed plate and block have oil conduits optimized for efficient engine oil circulation. The unthreaded holes pictured below are an example of them.

We manually pumped oil out of the cavities before getting to work accessing the bearings.

With oil further drained, we removed the main oil pump and its tubing.

I filmed and edited a reel of the rod bearing replacement process here.
With the tubes out, we removed the main oil pump and we had clear visibility on all connecting rod bearings. We turned the crank over to access most of them.

We had no prior indication of any rod bearing service. The connecting rod bolts were Genuine BMW.

We inspected the crankshaft journals and they all looked mint - except the journal for cylinder 1 and 6. It had a slight scratch that couldn't be felt at the touch of a finger.

We deemed it good to go and moved onwards.

The bearings were all successively taken out. These were more than likely the original bearings fitted at the factory in 2006.

We didn't muck about laying them out in the usual "grid" that you see. We pulled and replaced bearings per crankshaft journal.

Still, I laid it out in the usual "grid" to trigger your anxieties :) If you want to be really triggered, peek at my S85-001 rod bearing service here.

It has the usual tri-metal coating wear, most prevalent on the top side shells. They are pictured here as the lower row.

The wear is constant with Genuine BMW tri-metal connecting rod bearing wear. It was down to the copper. They still had some life left.

The new rod bearings twist.
With this out of the way, let's chat ACL bearings. I've used them across my entire engines to great success: S54, S65, and S85. They retain the original tri-metal coating designed to be softer on crankshafts, and give some warnings to wear.
They can also fix the clearance issues - if you believe there is one. On the S65 and S85, I previously used the "mixed set", which combines the standard sized ACL shells with their extra clearance sized HX shells.
On my new engine, I documented a new mix of ACL shells that I will shortly introduced. They were 3rd party measured to achieve the exact clearances over the Genuine BMW units.

Please, don't call your shop to pull your current ACL bearings, it doesn't make your current ACL bearings installation troublesome. This is about removing an extra layer of uncertainty to rod bearing service by eliminating any tolerances during ACL's manufacturing process.
I will go into further details in an entry specific to the new ACL measured bearings shortly.

The shells were all clipped into the lower connecting rod.

See the tab? It aligns the shell, this is important.

Rod bearings never look pristine, it's part of the manufacturing, and most recent measurement process. Be worried if tabs are broken or there is visibly gouges. Scratches are not gouges.

The upper connecting rod also has the tab, with the engine upside down - Phil had to reset instincts on how to insert the shells.

A few French swears (tabarnacle!) were emitted.

Still, it was pretty straight forward for Phil. He's performed 100 + of these services on S65s and S85s.

Phil doesn't like using assembly lube, and he doesn't, period. Instead, he lubes the shells with 10W60 oil. He feels assembly lube is best used on dry engines that have never ran: they need the extra protection during the start up phase.

The rod bolts were hand tightened, and fully torqued to spec.

With every torque spec achieved, the main oil pump and its tubing were refitted. The pan was left off as we would need to set the VANOS oil pump backlash later on.

With the basics out of the way, it was time to tackle the main event.
Up next: we remove the OEM camshafts, its valvetrain and fit the Schricks.
We'll chat springs, seals, seats, retainers, collets and more.

Leave a comment