

I unknowingly went dumpster diving.

"In this entry, I remove my replica CSL trunk to go back to OEM. I explain why and go in depth about what made the replica unit good from afar but far from good."
-Matt
A double take.
In late '22, I had the fiberglass replica of the Vorsteiner CSL trunk fully painted and fitted. I unfortunately wasn't around to document the installation back then, and chatted about my first impressions on fitment in my entry "Good from afar".
This was late October, the car went straight to storage and I forgot about it. The OCDs amongst us may start noticing the issues. This was a testament to our ability to fiddle with the trunk rather than the prowess of the Alibaba manufacturer.

You can only stay positive for so long.
Earlier this month, I test fitted the OE+ carbon trunk in preparation for the CSL carbon trunk. I didn't have the time to go in depth about the issues with the replica CSL trunk, and preferred focusing on the qualities of the new carbon trunk.
The replica looks fine from afar for most people. I couldn't help but photograph a few things that made me look sideways. What's going on here?


In retrospec, I dove into a dumpster.
Dumpster diving is a term first coined in the 80's for turning somebody else's trash into something useful - by literally diving into their commercial dumpster to find it.
This Series' equivalent, in retrospec, was the initial entry "Sourcing a discontinued classic". I bought what was to be a carbon Vorsteiner trunk and it turned out to be a replica fiberglass trunk.
It even had the exposed carbon lid line on the trunk - yet it was all a fugazi.


Dissecting trash.
Admittedly, it's with much frustration that I removed the replica CSL trunk to go back to the original metal trunk. The trunk was removed out of spite - and for the development of a new mold. There was nothing for us to retain beside the ducktail design.
Below, I compare all areas where the replica trunk was craptastic next to my original Genuine BMW metal trunk.
This is a reminder to try to always keep your original parts around, ever more so on body panels. Original BMW panels' fitment quality are tough to match. They might be heavy, they might be behind the times - but they fit right, every time.


The OEM trunk has every single cut out you need, and some you don't need on the M3 - but they're all in the right spot down to decimals of millimetres.


The replica's interior was slightly different, the edges were thick, the rounds not exactly round amongst other things. It made fitting interior components a PITA.
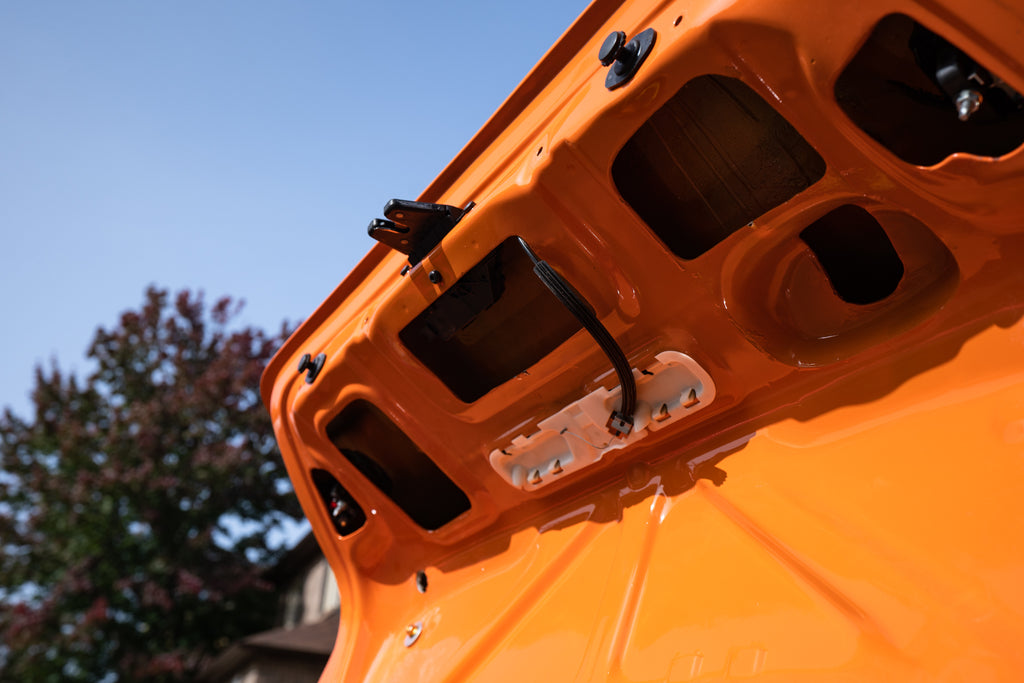
The BMW trunk's corner are slightly rounded off to match with the rear glass and quarter panel junction. The replica trunk doesn't look that bad from this angle - but wait.


Thickness.
The replica trunk's fiberglass is fat. Below is how thin the OEM metal trunk is. It will be hard for any composite trunk to match this - but there are levels to obesity.


Once you see it - it's done. It doesn't ever get better as you move afar. It only gets worse as you pit it against the OEM trunk.


It gets even worse as you zoom in. Sweatshop level cut outs that were too large and without the necessary indents to the edges. I touched on how the license plate lights wouldn't clip in the replica trunk and needed sealant in the previous entry test fitting the OE+ carbon trunk.


The original trunk was perfectly contoured. Sure, these were probably laser cut over hand cut - but it's apparent no efforts were made on the Vorsteiner trunk to get it even close.

BMW knows how to make panels that fit well, and most importantly, that are sealed off from the elements. They add these tabs to clip in the trunk badges as the trunk is not recessed. Those can usually be transferred to an aftermarket trunk or jobber equivalents can be sourced.


We broke the pins off the original badge and used 3M double sided tape to make it work.

The inner tail light's fitment was worthy of the Pacific's garbage patch. We had to shave off the lights grey plastic tab as the fiberglass was too thick.

An overdose of windshield urethane was needed to seal off the light and the fiberglass needed to be trimmed to align the lights correctly. You can spot the residue here. If you zoom in, you might just even the BMW logo stamped into it.

The oem trunk was plug and play - of course.

Back to Touring Spec.
Having recently sold of the demo OE+ E92 Carbon Trunk, I only had one option: back to the original shaved metal trunk. I felt it was a great opportunity to document the little things when fitting a trunk, along with tips and tricks to get fitment just right.
I also touch on expectations regarding panel gaps with the upcoming redux of the CSL Carbon Trunk. It also gives further perspective to my previous test fit of the OE+ carbon trunk.
I had previously removed the M Performance spoiler and sold it off. We had previously removed the original mini-spoiler. Glued with betalink, it needed a proper compound and polish to get it looking great.

The table was covered with every single accessories that was removed from the replica CSL trunk outside of the BMW badge.

My number one recommendation is to first fit the trunk to the hinges without any accessories fitted to it. There is an order in which you should put in the accessories that will make access to plugs, bolts and the wiring harness.
Metal trunks have sharp edges, this installation order will make easier on your hands (and patience). This is also a reminder to wear gloves.

The hinges upper bolt have a gap into which you can slide the trunk without having to worry about it falling off and breaking your back window (!). Lightly thread the hinges' bolts on the lower holes only. Those end up being on top of the hinges when on the car.

Next up, you can decide to fiddle with fitment or move to accessories. It doesn't matter as the fitment is achieved by adjustment bolts easily accessible. After fitting the trunk, I snapped in the struts and I fished through the wiring harness using this magnet wire fishing tool.
Push the wiring harness through the upper section of the inner trunk and position the plugs where the accessories will connect.

The electronic trunk latch was the first accessory I clipped in is Why? It's the most difficult plug to connect, and without it, you risk locking the trunk without any way to open it. As a precaution, fold down your rear seats :)

Before even clipping it in, I connect the plug. These are the pins into which the plug connects. It clips into the trunk, there are no bolts holding this.


Next, I put the height adjustment stoppers back into the trunk. These use subtle push pins. Be very mindful not to lose the pins.

Next up, I plugged the license plate lights and snapped them in - perfect fitment of course. They do have a driver / passenger orientation. It's intuitive. No 3M required here. I cleaned off the gasket maker.

I then bolted the trunk's latch. There are 3x bolts for it. I gently fished the emergency cable into its cut out section, and bolted the latch.

Torque this down right, and straight - misalignment can make locking / unlocking the trunk a PITA.

Then it was the inner lights' turn - they fitted through the openings without a hitch. I then secured with this bolted plastic holder against the metal inner section. Alignment work for the lights is minimal on the OEM trunk.

Notes on water infiltration.
We previously had to shave down the outer plastic tabs that usually clips around the thin metal section of the inner lights. We originally had to use windshield urethane to glue and seal off the lights. The original BMW seal broke off when removing the lights from the replica trunk.
Water infiltration will destroy electrical components and rust in the lowest section of the trunk: your battery tray (!). We re-use windshield urethane to get a proper seal and I drove around with tape on the headlights and let it sit overnight to cure.
Potential water infiltration is another reason to avoid poorly fitting aftermarket trunks or leave it up to the professionals for a proper installation.

My previous license plate holder was rusted and was missing 2x threaded inserts. I replaced it with the E46 M3's new unit I had laying around. I recommend you use BMW bolts - I didn't, because (?).
To clarify, those parts are universal across BMWs. I sourced another at the dealership for the E46's CSL trunk.

Lastly, we re-applied 3M double sided tape to the emblen as the pins were broken off to fit the replica hole-less trunk. I'll buy another to make sure it doesn't fly off - but whatever, it'll do for now.

We wrapped up the installation by clipping the emergency latch wire trim to the inner section, fished the wire though the liner, messed around with the emergency handle and push pin'ed the liner.
The standard panel gaps.
Deep down, I was glad - I couldn't look at the replica trunk any longer without thinking of its every single defects. The Touring Spec holds a special place in my heart: it's functionally & aerodynamically a step back, but aesthetically, it's a looker.
Most importantly, my OCD was back to sleep as I looked upon the proper panel gaps around the original trunk.
Let's go around the trunk and set a baseline to how a proper aftermarket trunk should be able to fit without obscene modifications.

 I got both sides to match on trunk-to-quarter panel gap width.

All 3x axis of gap alignment were spot on: height, width, and the forward/backward position.

The light fitment is great. You'll notice the horizontal gap above the lights is visibly wider than other gaps. That's how they sit - I assume for water circulation.

The back-window-to-trunk gap is wide - and unsealed. Water drops into gutters that run through the sides into the outer taillights' rubber attachments.
 It applies on both sides. You can easily view the hinges from this angle: I had never notice this before. I'll blame it on having my face up and down trunks (!?) for the last few weeks.

Speaking of which - how corners fit is a leading indicator of a trunk's fitment. How the original trunk fits reminded me of the OE+ Superlight carbon trunk fitment.

So long, replica CSL trunk - it's never going back on my car. That GTS wing though? Definitely.

For as much vitriol I can spill over the trunk, its original ducktail design was, in my opinion, perfectly created.
Up next: Vorsteiner gets to work on the redux of their original E92 CSL design.
Until then, you can spec your E92 CSL style carbon trunk here.


